|
Your account | Log in or Register |  |
.gif) | |||
|
Stock photography, both royalty free & licensed | About us | Help |
| ||||||||
|
| |
|
|
|
| |
| |
| |
| Home > Contributors > Image
submission |
|
| Image submission |
|
|
Listed below you will find all the information you need to submit images to Alamy, including: |
 |
| |
Please read this document carefully before you submit images. We will reject any submissions that do not adhere strictly to all of these guidelines:
Notes / Actions Images from a scanner Images from a digital camera Register as a Contributor Ensure you register as a contributor before sending in your test images. See the joining process for more information. Editing If you submit technically inferior or otherwise unsuitable images, we reserve the right to reject them so it's worth spending time editing your portfolio before sending it to us. First Submission - Test Stage We cannot accept more than 10-15 images for your first submission. See the joining process for more information. Written information on the media Clearly write your name and email address on the CD/DVD, using a permanent marker pen such as the "Staedtler Lumocolor Permanent". DO NOT use any stickers or labels. Write “DIG” on the media and also clearly write your name and email address on the CD/DVD, using a permanent marker pen such as the "Staedtler Lumocolor Permanent". DO NOT use any stickers or labels. File type TIFF files only (No JPEG, Bitmaps or PSD files). TIFF files only (No RAW or JPEG files). File size 48 MB minimum (unless reportage material); Interpolation is not acceptable. 48 MB minimum. All digital camera images must be captured on a digital camera capable of producing files of 14MB and upwards. Please then interpolate the images to a minimum of 48MB using professional upsizing software. We recommend Genuine Fractals (http://www.lizardtech.com/) for the best results. We reserve the right to reject over manipulated images. Bit depth Scan to the highest bit depth possible but convert to 8 bit before sending the images to us. 8 bit images. Orientation Please ensure that your images are the right way up when viewed on a monitor screen. Images that are not aligned properly will be rejected. Dirt/Dust/Hairs Images must be spotless and will not be accepted if they aren't. Interpolation/Upsizing Not acceptable Accepted if using interpolation Software such as Genuine Fractals. Sharpening Not acceptable LZW Compression Not acceptable Byte order of TIFF file PC (you will be given an option of "PC" or "Mac" when saving images in Photoshop, please choose "PC"). Image mode RGB Media Format CDs - ISO 9660; DVDs - ISO 9660/UDF format. Please write DVDs at single speed - this takes longer but reduces errors. Inclusion of information on the media CDs / DVDs should contain TIFF image files only and no sub folders. Please ensure there is nothing else on the media. Placing any other files such as text files or low-res thumbnails on the media is not acceptable. Please do not include any correspondence to us on media; queries should be by e-mail only, to memberservices@alamy.com. Model Release and keywording information If relevant, do not put any keywording or model / property release information on the submission (e.g. Excel spreadsheets) – this is done online by you once your images are uploaded. IPTC headers or 'File Info' If your images have IPTC information embedded in them, Alamy will only import the 'Caption' and 'Keywords' IPTC fields - no other IPTC fields will be imported.
Note: 'Caption' matches to the Alamy 'Caption' field unless it is larger than our limit of 128 characters -if this is the case it will be imported into the Alamy 'Description' field of your image.Media handling and packaging Please ensure you handle your CD/DVDs with care and use a case to send them in. You should also mark the value of the goods sent to Alamy as 'of no commercial value' - we will return them back to you unopened if this is not done. Address to send test images only The TEST CDs/ DVDs should be addressed to:
QC Test
Alamy Images
6F Milton Park
Abingdon
Oxfordshire
OX14 4RR
United Kingdom
Agencies should send submissions to the address above but please mark them “AGENCIES”Address to send subsequent submissions Image Submission
Alamy Images
6F Milton Park
Abingdon
Oxfordshire
OX14 4RR
United Kingdom
Agencies should send submissions to the address above but please mark them “AGENCIES”Return of media Due to the large volumes of submissions we receive, we regret that we cannot return any CDs or DVDs submitted to us.
Explanation of some of the above points
- Checking and modifying your digital files
If you are supplying scanned images, it is essential that you check the quality of your scans before you send them to us. It is highly likely that your images contain small blemishes picked up during the scanning process (either from particulates in the air, or dust embedded in the film). You must check your images at 100% zoom with image editing software such as Adobe Photoshop. If the image is larger than the available screen area, start in the lower left-hand corner of the image and work your way around clockwise. Take time to review each section and use cloning tools such as those supplied with Adobe Photoshop.
If you are applying any layers or filters (such as radial motion or blur) to your images prior to flattening them for submission, please ensure that you check the image once again at 100% zoom. Subtle differences between the grain of the original film and the smooth texture of any layers or filters can be overcome by using the noise filter in Adobe Photoshop.
- Submitting images to Alamy
Alamy Images require that contributors supply their images as RGB TIFF files, PC byte order, which is a true cross-platform format, and contains all of the original data. Please ensure that the file is not compressed in any way. Name your files according to your own filing system, as this will help you retrieve information about your images once they are online.
Alamy accepts both CDs and DVDs. Please set the file system to ISO9660 before writing the CD or DVD (we can also accept UDF format for DVDs). Please write DVDs at single speed as we find writing at faster speeds can cause data corruption.
- Colour considerations
The issue of colour management for digital images is complex. To simplify things, Alamy asks contributors to submit images in RGB format. This is because the CMYK format has a smaller colour space, and so will effectively contain less colours. When setting up Photoshop, set your RGB “colour settings” to “Adobe RGB 1998” on both a Macintosh and a P.C. Depending on your version of Photoshop, the colour settings menu can usually be accessed from the ”Edit menu”.
The appearance of your digital images will vary according to the monitor you use, and again when printed on paper. One important operation to carry out at the start is to calibrate your monitor. This can be done with specific software packages and on screen meters, or more easily with the Adobe gamma software, which is an integral part of Photoshop. Make sure that the monitor has been running for around half an hour before the calibration process, and that any ambient light is consistent. Another important point is to make sure that you have a completely neutral grey desktop pattern on your monitor, against which to view the images.
- Image sharpening – don't do it!
The majority of digital images, be they from digital camera or a scanner require sharpening to get the best results. Some digital cameras, such as the DC620, have an anti-aliasing filter in the body of the camera, which actually softens the image in order to reduce aliasing effects. The images must be sharpened at some stage to give the best quality result.
When placing images with Alamy, however, images must be unsharpened (not to be confused with 'soft scans' or 'unsharp scans'). This is so that clients and their printers can decide for themselves how much they wish to sharpen the images.
- Scan images yourself or get a bureau to do it for you.
- Scan low contrast originals wherever possible.
- Assess your scanner by the optical resolution and not by the interpolated resolution.
- Carefully check the quality of your digital files before you submit them to us.
- Use slow, fine grain film such as Fuji Velvia or Provia.
- Use the best lenses.
- Calibrate your monitor.
- Preparing digital images
- Take care with contrast
- Images from digital cameras
- Scanning images
- Image processing software
- Simple Retouching Techniques
- Glossary
- Preparing digital images
There are a number of different options for obtaining digital images, including:
- Digital cameras
- Scanning photographic images
Most photographers currently shoot their work on film, although increasing numbers use digital cameras. Film images will need to be scanned to convert them to a digital format. Alamy offers a variety of file sizes to our Image buyers, as can be seen from our image specifications. The following paragraphs address some of the common issues associated with digital imaging. Please note that this is an evolving document, so any feedback would be most appreciated.
- Take care with contrast
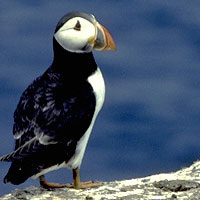
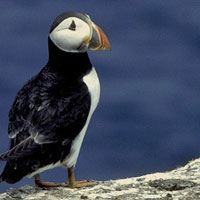
Images need to be of the highest possible technical quality. In general, shoot on the finest grain film, and with high quality lenses. Please note, however, that fine grain film is inherently high in contrast. Most desktop scanners cannot record the wide brightness range (dynamic range) of modern transparency film. If you are shooting images which are going to be scanned, try to keep the contrast down. However, do not go to the other extreme and shoot images with a 'flat' contrast.
High contrast Normal contrast
(note more feather detail)
- Images from digital cameras
Digital cameras have become increasingly popular over the last couple of years with professional photographers. For submitting digital images to Alamy please interpolate images to a minimum of 48MB using professional upsizing software. We recommend Genuine Fractals (http://www.lizardtech.com/) for the best results. Please also note that extensive manipulation degrades images to an unacceptable degree, and we reserve the right to reject such images. It is important they stand up to the same scrutiny as all images passed through our QC system - see our guidelines above. Please ensure you label all submissions from digital cameras with "DIG".
- Scanning images
It is now possible, using reasonably priced desktop scanners, to produce results good enough for high quality reproduction purposes. We recommend that you visit our scanner reviews for information on scanning equipment.
- Resolution
Scanners contain light sensitive silicon chips known as CCDs. This device contains many thousands or millions of light sensitive picture elements, or pixels. These act as light meters, sampling the light reflected from the surface of prints, or the light transmitted by negatives or transparencies. Scanner resolution is defined by the number of pixels in one inch ('ppi', often referred to as 'dpi'). If the CCD in the scanner is 8.5” wide, and contains 2540 elements, then the maximum resolution possible is 2540 divided by 8.5 i.e. approximately 300 per inch. This figure is the true, “optical” resolution of the scanner. Another figure will often be quoted by manufacturers – the interpolated resolution. This is where the scanner software invents, or interpolates new data, so that a 600dpi scanner can effectively scan at resolutions of 1200 or even 4000 ppi. Generally, scanning at the optical resolution will give better results than interpolated resolutions.
- Dynamic range
Bear in mind what was said earlier about contrast. As a rough guide, the human eye can perceive differences in tone within a brightness range of around 10000:1, whereas colour transparency film can only record detail in a subject having a brightness range of around 100:1 or less. Many scanners do not have the ability to record all of the tones recorded by the film, and detail can be lost in the highlight or shadow areas of the image. Scanning low contrast originals or prints will give much better results. In general, CCD scanners have a lower dynamic range than drum scanners. Manufacturers often quote figures for the minimum and maximum densities (Dmin, and Dmax) which scanners can record. The difference between the two figures is the dynamic range. Try to find a scanner which quotes a figure of 3.0 at least.
- Colour (Bit) Depth
The colour depth or bit depth of an image is the number of colours it can potentially contain. RGB images are generally composed of three 8 bit channels, each of which can have up to 256 shades of tone or colour. The three RGB channels combined can generate a total of 16.7 million colours. These are usually referred to as 24 bit images. Many scanners offer the option of scanning in 10, 12, 14 or 16 bits per channel. This allows a greater range of shadow details to be recorded in particular, even though the final output will be in 8 bits per channel. In general, you should use the highest available bit depth when scanning your images.
- Scanning different formats
- 35mm originals
- To achieve a 70MB file from a full frame 35mm transparency, requires a scan resolution of approximately 4000ppi. Most “desktop” scanners, such as the Nikon CoolScan, can only scan at resolutions of around 2500ppi. Newer models are appearing all the time, from various companies such as Polaroid and Flextight, capable of upwards of 4000ppi.
- 6 x 6cm and 5 x 4” originals
- The larger the film area, so the smaller the scanning resolution needs to be to achieve a 70MB file. Medium format transparencies require a scan resolution of around 2000ppi, whilst a 5 x 4” original will need to be scanned at around 1000ppi.
- Scanning Prints
- If you are thinking of scanning prints then you must remember, the quality of the original print is paramount – it must be sharp, with good colour saturation, and without excessive contrast. As with film, the scanner should be of the best quality possible. As a rough guide, a 10 x 8” print will need to be scanned at around 500ppi.
- Image processing software
Image processing packages, such as Adobe Photoshop, can perform a range of enhancements and manipulations to images. The density, contrast and colour balance can be controlled very precisely with such tools. Learn how to use the levels and curves controls of Photoshop rather than the simple brightness and contrast controls. These will allow you set the maximum and minimum densities of the image, and to govern the contrast for different areas of the image.
- Simple retouching techniques
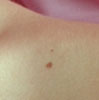
Most digital images, like their film counterparts, will require some "spotting" or retouching at some time. This might be of dust specks or hairs picked up at the scanning stage, or removal of small blemishes from the original image. This brief article outlines some of the basic techniques, using Adobe Photoshop v. 5 as an example. Other image processing programs will have similar facilities. The toolbox in Photoshop contains various pencils, brushes, air brushes and rubbers, which can be used, just like normal drawing tools to draw and paint onto areas of images. Colour can be sampled from the image using the "dropper" tool, which is then loaded into the various painting tools. However, for retouching purposes, theses are perhaps not the most useful tools. As can be seen from the enlarged illustration (fig.1), the hair is composed not of a single tone of colour, but a multitude of different coloured pixels. Painting this with a single tone with a paint brush does not solve the problem (fig.2).
FIG. 1
FIG. 2 Instead, a much more useful tool is the cloning tool, or rubber stamp tool (fig.6). This can be used to copy pixel for pixel areas of tone, to eliminate defects such as spots or hairs. First choose a suitable size of stamp (for this purpose ensure that in the preferences of Photoshop, you check the "brush size" box: File > Preferences > Display and Cursors > Brush Size, so you can see exactly the diameter of brush chosen), then put it into an area immediately next to the blemish to be removed. Using the command Alt Click, samples this area. Now move the stamp to the blemish and click the mouse. You will now see two cursors - the sampled point and the area to be improved. This starts to replace the pixels under the mouse with the ones sampled. This may take some getting used to but with practice even large blemishes can be effectively removed (fig.3).
FIG. 6
FIG. 3 The usefulness of the rubber stamp tool can be further extended by double clicking on it, which brings up the rubber stamp options box. Here the opacity of the tool can be altered, but, more importantly, the "blend mode". In normal mode the stamp literally clones pixels from one area to another. Try using the lighten and darken modes. In darken mode, the tool will only paint colour if the destination is lighter than the source, whilst in lighten mode the opposite will happen.
You may need to sample an area several times to prevent tell tale repetition of pattern. The cloning tool can also be used like a spotting brush for removing small areas of dust and blemishes like the one shown in the illustration. Rather than painting with the tool, a single click is used to lay tone over the blemish. Use a soft edged brush slightly larger than the area to be removed (fig.4, 5).
FIG. 4
FIG. 5 Further Photoshop training and tutorials are available from Adobe.
- Glossary
- CMYK
- Cyan, Magenta, Yellow and Black (K = Black) - the four colour inks used by printers for printing books, magazines etc with the four colour litho process.
- DPI
- Dots per inch – the resolution of a printing device.
- Interpolation
- The process by which software “invents” new data to create larger images.
- PPI
- Pixels per inch – the resolution of a scanning device.
- RGB
- Red, Green, Blue – the three primary colours of light, and the system used by computer monitors to display images.
- TIFF
- Tagged Image Format, a cross platform image file format.
- USM
- Unsharp Masking - the best way to sharpen digital images, although Alamy require that you do not sharpen the images submitted to them.
- JPEG
- Joint Photographic Experts Group.
- UDF
- Universal Disc Format.
|
|
| Stock photography - Alamy HOME
| Stock
photography on Alamy | Royalty free
images | Licensed images | Site map Choosing the right file size for your stock photos | Stock photo usage - a glossary of terms Alamy and its logo are trademarks of Alamy Ltd, and are registered in certain countries Powered by PLS from AOL | Security and privacy | Terms and conditions | Contact us Copyright © 2003 Alamy Ltd. All rights reserved. |
|